WHAT IS IT
| Lithographic printing is a method for printing the black and white or color photos we see in most magazines, brochures, newspapers and books. It is also called photo offset printing. |
Lithography: A printing method based on the principle that oil and water
do not mix, but remain separate when added together. It was invented in
1798. The 'litho-' part of the word means stone. The
'-graph' part means
writing. So lithograph means stone writing.
When it was first invented, a greasy crayon made
from oil and black pigment was used to draw a picture onto a smooth flat
stone. Water was then applied to the stone drawing. The black greasy
drawing repelled the water, pushing it away from all the parts of the
stone where the crayon was used.
Does this sound like doing a drawing the hard way?
It would be, if the only purpose was to make a single drawing. Here's
where the next step of the invention took place. With the stone still
wet, any wet surface areas on the stone repelled the oil-based ink. When
applied to the stone, this ink remained only on the parts of the stone
with the grease crayon drawing.
A blank sheet of paper was then pressed down onto
the stone. When the paper was removed, a copy of the drawing was copied
onto the paper. When additional ink and water were applied to the flat
stone, the water stuck only where there already was water. The ink stuck
only to where there already was ink, So by adding more water and more
oily ink to the stone, another paper copy was made. This process was
repeated so that many paper copies were made from the single stone
drawing. The copies dried and became permanent.
This was a "eureka moment" in the history of printing. Did the copy
match the original drawing? Not exactly. Why not? It was because the
process created a mirror image of the original drawing. With current
lithographic systems, the final paper print does match the printing
master. Why? See Offset-Lithography below.
How is Lithography used today?
Instead of drawing the original picture,
photography is used in lithography.
How is the oil and water principle used with photos?
A printing master* can be made by using
photography. This printing master would take the place of the stone. The
photographic process can be chemical or electrostatic*. The photo
process creates a printing surface where the image is divided up into
areas that attract water and repel oil -or- areas that attract oil and
repel water. First water, then an oil based ink is applied to the
surface of the printing master. The inked image is then transferred from
one surface to another mechanically by bringing the printing master in
physical contact with the paper.
*A "printing master" is similar to a printing
plate except it is made of a thin flexible sheet of material. A finished
printing master is flat in appearance. It is flexible so it can be
wrapped around a cylinder or drum that rotates. See the diagram below.
*Electrostatic: This is a photocopy
process used by laser printers and copy machines. The same method has
been adapted to make lithographic printing masters. Computers can also
be used to assist in the making of printing masters electro-statically.
Here is a diagram of a typical offset
system
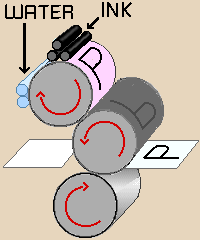 |
|
||
 |
 |
MASTER |
|
 |
BLANKET |
||
|
|
CYLINDER |
With this system, the inked image is offset. This
means that the inked image from the printing master is transferred first
to a rubber covered drum which then comes in contact with blank paper.
This go-between step saves wear and tear on the printing master which
never directly touches the paper. The image is reversed like a mirror on
the rubber drum, but reverses back to normal on the printed paper. The
transferred ink portions will produce the printed image. Presses may be
designed to handle paper in single sheets or continuous rolls. Paper
printed from continuous rolls is cut into sheets after printing.
Since there can be only clear paper areas or solid
ink areas in a printed copy, how are different shades and colors made in
a lithographic picture?
|
Lithography is an ALL or NOTHING
process. Wherever ink touches the blank paper, a uniform amount
of ink is applied. Where there is image there is ink. Where
there is no image, the paper remains blank. So at any point on
the paper, there is either a full application of ink, or none at
all. There are no in-between shades. |
|
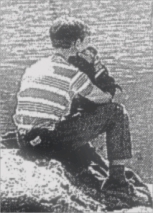
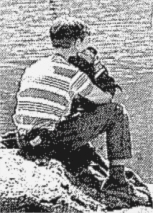
| Areas of solid ink are not suitable for printing full tone images. This photo has only two tones, black and white. There are no intermediate shades. |
 |
Since the oil and water principle allows for
only two possibilities, areas with ink, and areas without ink, there
needs to be a way to print different shades of light and dark. One
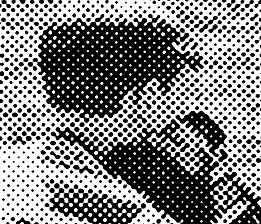
answer is to break the picture into very tiny dots.
Printing different shades or tones
So a way to
break up the inked parts of a picture into tiny dots of different sizes
was invented. Each dot will print ink as dark as any other, but the size
of the dots and the spaces between the dots will make a difference. It
will make parts of the picture look lighter or darker. If these dots are
made small enough, we see different shades instead of the individual
dots. If you examine a printed photo closely or use a magnifying glass,
you can see the dots. A picture that is broken up into small dots is
called a halftone image.
When greatly enlarged, different tones or shades can be seen as
separate black dots on white - or - white dots on black. At a normal viewing size and distance, halftone images
appear to be a wide range of tones.
CREATING A RANGE OF TONES FROM A PHOTO
 |
|
| Photograph | Printed with solid Ink |
 |
 |
| Printed with Halftone Dots | Magnification shows dots |
What about color?
How are dots used to
make different colors?
Color lithography applies the same half-tone
technique to color. In the case of color, dots comprised of four basic
colors are used to print most full-color images. However, the ink for
each of these four colors is printed one at a time on top of one
another. In this case, the lithographic printing machine would have four
sets of printing cylinders, four sets of offset blankets, and use four
master printing images, one for each color.
Due to the way color mixing works, the human eye
can resolve these four basic color dots into an entire range of
different colors and shades. When magnified, you can better see the
individual dots of color. From normal viewing distances, the color dots
blend visually and we usually do not notice the individual dots.
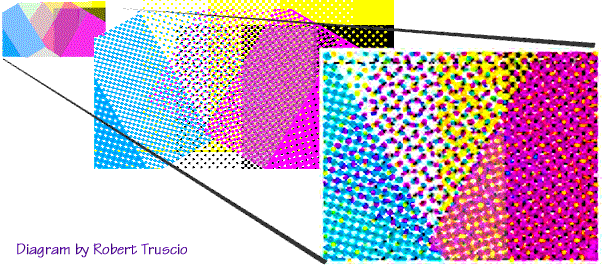
The colored shapes shown on the left appear as if viewed at a normal
viewing distance. The dots are very small and our eyes tend to blend
them together.
The shapes at the center and right appear as they would if greatly
magnified. The dots are "screened" at different angles so that they do
not create distracting moiré or wavy patterns. The four basic colors
used in offset printing often go by the names "process red", "process
yellow", "process blue" and "black".
(Process red is somewhat brighter and pinker than
what we might call red. It is like the magenta ink used in inkjet
printers. Process yellow is a bright lemon color. Process blue is a
bright blue that is like the cyan ink also used in inkjet printers.)
|
|
|
||
 |
|||
| YELLOW | CYAN | ||
| MAGENTA | |||
 |
 |
Full Color |
|
| BLACK | |||
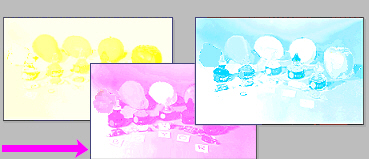
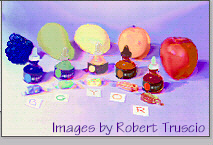
Above is a photo of different color fruit, bottles of colored inks and pieces of hard candy. The photo was first separated into the four basic printing colors. (Notice that the yellow lemon appears yellow only in the yellow image and appears white in the other three images. Meanwhile, the orange appears yellow in the yellow image and magenta in the magenta image. But the orange appears white in the cyan image and the black image. The magenta and yellow ink combine to form the orange's color with almost no trace of cyan or black in it.) Each image was then converted into a separate halftone dot image on each of four printing plates. At that point, there was no color at all on the "printing plates" until rollers coated each one of them with a different color ink. When the yellow, cyan, magenta and black inked images were pressed in contact with the paper, one on top of the other, it formed a full color image as shown above.